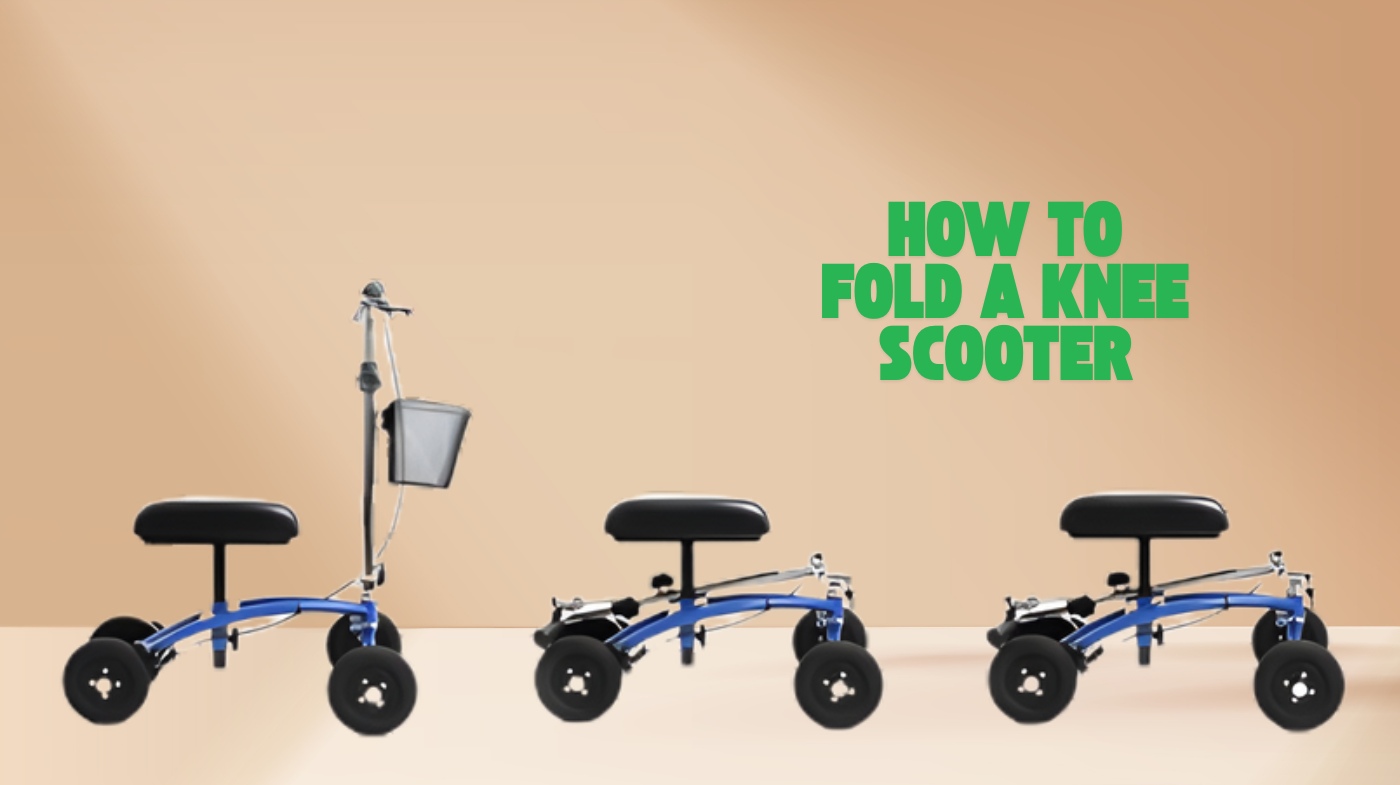
To fold your knee scooter, first release the frame lock by pulling or turning its release lever near the base. Next, unfasten the handlebar clamp and gently lower or fold the steering column back toward the knee pad.
Secure the brake by locking its lever to keep the scooter stable, then guarantee all folding clamps click firmly to prevent accidental unfolding.
Taking these steps will make your scooter compact and safe for transport. Keep following along for tips on perfecting each step.
Key Takeaways
- Locate and release the frame lock near the steering column to disengage the folding hinge safely.
- Loosen or rotate the quick-release lever or clamp at the base to free the folding mechanism.
- Unfasten the handlebar clamp and lower the handlebar carefully for a smooth fold.
- Fold the steering column backward toward the knee pad and secure it to prevent unfolding.
- Engage the brake lock and perform a stability check to ensure the scooter stays securely folded.
Identifying the Folding Mechanism
When you’re ready to fold your knee scooter, the first step is to identify its folding mechanism. Most scooters feature hinge-based folding points near the base or handlebar post.
Start folding your knee scooter by locating its hinge-based folding points near the base or handlebar post.
Look closely for a locking knob, pin, or lever that secures the frame when open and disengages it for folding. You might find a twist lock, compression lock with a release lever, or a locking pin holding the frame rigid.
Some models include spring-loaded hinges that lock automatically and need manual release. Check if you need to twist, press, pull, or remove a component to disengage the lock. It is important to keep track of all parts such as the twist lock, screw, washer, spring during this process.
Understanding your scooter’s specific mechanism helps you fold it safely and efficiently, making storage and transport much easier. Always ensure the scooter is in proper working order before folding, including checking the brakes and throttle for safety.
Preparing the Handlebar for Folding
Hey there! Before you fold up your knee scooter, you’ll want to start by releasing the handlebar clamp. Just unfasten it so you can get it ready for folding.
Once that’s done, go ahead and lower the handlebar height carefully. This step is key for a smooth fold. Be sure to double-check all locks and screws to prevent wobbling or accidental folding.
Make sure to lift the clasp and move it forward to disengage the folding mechanism properly. And don’t forget to secure the handlebar afterward! You want to make sure it stays in place during transport.
Releasing Handlebar Clamp
Although releasing the handlebar clamp might seem tricky at first, you’ll find it straightforward once you know where to look and how to operate the quick release lever.
Start by locating the clamp lever at the base of the steering column. Lift the lever upward, then pull it forward to fully disengage the clamp. To ensure proper function, place washer onto the clamp during reassembly if necessary.
Make sure the handlebar is free and can move easily before folding. Don’t force it if it feels stuck; check for dirt, debris, or stiffness from lack of lubrication. Proper maintenance and regular cleaning help keep the mechanism operating smoothly.
Before releasing, inspect the clamp for loose bolts or damage to avoid injury. Regular cleaning and lubrication prevent common issues.
Lowering Handlebar Height
Since lowering the handlebar height is key to preparing your knee scooter for folding, you’ll want to locate the adjustment mechanism first. Look for a lever, knob, dial, or pin near the vertical handlebar stem. Proper handlebar adjustment also helps maintain balance and stability during riding.
Loosen it by turning counterclockwise or flipping open the lever. Slide the handlebar stem down fully, aligning it with the knee rest platform for compactness. Once lowered, tighten the mechanism securely to prevent movement.
To ensure safety, make sure the handlebar height promotes balance and comfort before folding. Confirm brakes and cables aren’t pinched. Here’s a quick guide:
| Step | Action |
|---|---|
| Locate | Adjustment lever or knob |
| Loosen | Turn counterclockwise or flip |
| Lower | Slide stem down fully |
| Tighten | Secure knob or lever |
| Check | Handlebar firmness & cables |
Following these steps makes folding safe and easy.
Securing Handlebar Position
When you’re ready to fold the handlebar, start by locating the clasp or locking lever that secures it in place.
Lift or open this clasp to release the locking pin, paying attention to any directional marks that show how to push or pull it.
Once disengaged, fold the handlebar down toward the scooter base.
The handlebar is designed to fold down for easier storage and transport, which is especially helpful for fitting the scooter into a car.
Ensure the scooter is on a stable surface before folding to prevent tipping.
After folding, realign the locking mechanism by pushing the clasp back so the pin locks into the hole or slot, ensuring the handlebar stays stable.
Close the clasp fully to prevent it from unfolding during transport.
Double-check the handlebar remains locked before moving or storing your scooter.
Releasing the Frame Lock
Hey there! So, let’s talk about releasing the frame lock. First things first, you’ll want to locate the frame lock. It’s typically found near the base of the steering column or at the folding joint.
Once you’ve got your eyes on it, go ahead and disengage the locking mechanism. You might need to pull, push, or turn the release lever or ring—just do what feels right! Remember to pull down guide pin ring as part of the process to ensure the hinge disengages properly.
And before you dive into folding, make sure the frame is moving freely. This step is super important to avoid any damage or safety issues down the line. Also, when parking your scooter after folding, consider using secure locking techniques to prevent theft.
Locate Frame Lock
Where exactly do you find the frame lock on your knee scooter? Typically, it’s located at the base of the steering column, near the folding joint where the handlebar meets the main frame.
You might see a lever, knob, or quick-release clamp, often brightly colored or labeled with “Lock” or “Unlock” for easy identification. This lock is designed for one-handed use, positioned within reach whether you’re standing or seated. Proper placement helps avoid unnecessary strain and supports safe handling during operation.
Its placement ensures you won’t need to strain or bend awkwardly, even when your scooter is loaded with accessories. To fold the frame, you generally need to loosen the quick release handle and push the handlebar tubing toward the area where the seat was positioned.
Different brands vary slightly; some use a quick-release clamp, others a lever or compression lock, but they all share the goal of making folding quick, safe, and straightforward for you.
Disengage Locking Mechanism
Before you begin folding your knee scooter, you’ll need to disengage the frame locking mechanism carefully to avoid accidental collapse.
Locate the quick release clamp or lever near the steering column base. Usually, you rotate the lever counterclockwise or pull it gently upward to unlock. Many models, such as those in the Fusion Series, are designed with an easy-to-use locking system to ensure safety. It is important to ensure the scooter’s anti-tip mechanism is properly engaged before folding to maintain stability.
Make sure the scooter is stable and no weight rests on it before proceeding.
| Step | Action |
|---|---|
| Locate Lock | Find lever or clamp near steering base |
| Disengage Lever | Rotate counterclockwise or pull gently |
| Confirm Unlock | Ensure lever moves freely without binding |
Once unlocked, the frame is ready to fold safely. If the lever doesn’t release, check for secondary pins or debris blocking movement.
Ensure Frame Freedom
After disengaging the locking mechanism near the steering column, the next step is to ensure the frame can move freely for folding.
Loosen any quick-release clamps or levers at the base by turning or lifting them, allowing the frame tubing to move without resistance.
Remove locking pins or accessories like the front basket or seat if they block folding.
Push the handlebar or steering column tubing gently toward the knee rest area to confirm freedom of movement.
Always ensure the brakes are engaged and your weight is off the scooter to avoid accidents.
Check clamps and pins are fully loosened before folding to prevent damage.
If needed, use included tools to ease stuck parts and regularly maintain locks for smooth operation.
For added security and proper function, it is important to secure locking mechanisms before folding or transporting the scooter.
Folding the Steering Column
When you’re ready to fold the steering column of your knee scooter, start by locating the quick-release lever or clamp near the base of the column, usually positioned close to the knee pad.
Pull the lever upward and forward, or slide the clamp to the side, depending on your model, to release the locking mechanism. You’ll often hear a click or feel the column shift, indicating it’s freed. Use the quick release lever by rotating it upward and outwards to unlock the column.
Release the locking mechanism by pulling the lever or sliding the clamp until you hear a click or feel movement.
Once released, gently fold the steering column backward toward the knee pad until it aligns flush with the scooter’s base. Folding mechanisms that operate quickly and tool-free improve portability and ease of transport.
Make sure it secures in place to avoid accidental unfolding. If the column feels loose, adjust the clamp by turning it clockwise to tighten or counterclockwise to loosen.
Securing the Brake During Folding
Though folding your knee scooter might seem straightforward, securing the brake properly is vital to keep it stable and prevent any accidental movement.
Start by pulling the brake lever toward the handlebar and pressing the spring-loaded push button down until it locks. Confirm the brake wheel stays firmly on the ground and the lock holds tight before folding.
This ensures the scooter won’t roll or collapse unexpectedly.
| Step | Action | Purpose |
|---|---|---|
| Pull Lever | Engage brake lock | Prevents wheel movement |
| Press Push Button | Secure brake in locked state | Keeps brake firmly engaged |
| Confirm Contact | Brake wheel on even surface | Stabilizes scooter during folding |
Always check brake engagement before folding for safe handling.
Adjusting the Folding Clamps
Securing the brake sets a solid foundation for folding your knee scooter safely.
But you’ll also need to adjust the folding clamps to guarantee the scooter locks firmly in place.
Locate the quick release lever near the base of the steering column or frame fold point.
If you notice any looseness after folding, you can tweak the clamp tightness by turning the lever knob clockwise to tighten or counterclockwise to loosen.
Make adjustments gradually to avoid damage. Proper clamp tension prevents wobbling and ensures smooth operation.
Remember that the quick release lever is essential for securing the steering column and must be properly locked to maintain stability.
Keep these tips in mind:
- Pull and rotate the lever upward to release the clamp.
- Align the lever in the groove when re-engaging.
- Check for wear or cracks regularly.
- Lubricate pivot points for smooth action.
- Avoid overtightening to prevent clamp damage.
Ensuring Proper Locking After Folding
Because your knee scooter’s safety and ease of transport depend on it, you’ll want to make certain the folding mechanism locks securely every time.
After folding, visually inspect the joint for gaps or misalignment. Confirm that the twist lock is fully rotated, the quick-release lever latched, or the mechanical clamp tightened per your model’s instructions.
Give the scooter a gentle shake to ensure it doesn’t move or unfold unexpectedly. Listen for a distinct click or snap, signaling the lock is engaged.
If your scooter has a push-button latch, make sure it snaps firmly into place.
Regularly check and lubricate moving parts to keep locking smooth.
Proper locking prevents accidents, protects components, and keeps your scooter compact and ready to carry with confidence.
Frequently Asked Questions
Can I Fold the Knee Scooter With One Hand?
You usually can’t fold a knee scooter safely with one hand because the mechanism requires two hands to release the latch and control the folding motion.
Trying one-handed folding risks incomplete disengagement or instability, which could cause damage or injury.
If you have limited use of one hand, consider models with lighter frames or consult a professional for assistive tools.
Always follow safety guidelines to protect yourself and your scooter.
How Much Space Is Needed to Store a Folded Knee Scooter?
Think of storing a folded knee scooter like tucking a small suitcase under your bed. It usually needs about 2 to 3 square feet of floor space, with a vertical clearance around 15 to 20 inches.
Most scooters fold compactly, fitting easily into closets, car trunks, or under beds.
Just make sure you have enough room to slide it in and out comfortably without forcing the folds, keeping your scooter ready whenever you need it.
Are There Weight Limits for Folded Knee Scooter Transport?
Yes, there are weight limits you should respect even when transporting your folded knee scooter.
The weight capacity stays the same whether it’s folded or assembled, so don’t exceed your scooter’s maximum limit during transport.
Always check that folding joints are securely locked to maintain strength and avoid damage.
Handling it carefully protects the frame and brakes, ensuring your scooter stays safe and functional for when you use it again.
Can I Fold the Scooter if the Battery Is Low?
Yes, you can fold your knee scooter even if the battery is low.
The folding mechanism works mechanically and doesn’t rely on battery power.
Just make sure the scooter is powered off and stationary before folding to stay safe.
If your scooter has motorized folding, it might be disabled at low battery, so you’ll need to fold it manually.
Always double-check that the folding locks are securely engaged after folding.
How Do I Clean and Maintain Folding Parts?
You should wipe the folding joints weekly with a soft, damp cloth to remove dust without scratching.
Dry moisture immediately to prevent rust. Avoid harsh cleaners, and apply a silicone-based lubricant occasionally to keep hinges smooth and squeak-free.
Inspect screws and clamps regularly, tightening or replacing them if needed.
Store your scooter in a dry place, and always test locking parts to guarantee safe, reliable folding and unfolding.
Ready to Fold Your Knee Scooter the Right Way?
Now that you know how to fold your knee scooter, you can easily store or transport it without hassle. Just like Sarah, who folded hers quickly before catching her bus, you’ll find it saves time and effort.
Remember to secure the brake and double-check the locks to keep everything safe. With a little practice, folding your knee scooter will become second nature, making your recovery smoother and more convenient every day.