If you’re looking to give your bike rack a refreshed look and protect it from the elements, painting is definitely the way to go. Not only will it breathe fresh life into an existing rusty relic, but you can also create something special in any area, from the garage to the garden.
Remember, though, that successfully transforming your metal bike rack requires more than just choosing some colors. Depending on your desired finish, you can use either latex paint or spray paint as your primary source of color.
To make sure that all goes well with this project, there are certain steps you should follow, which we’ll gladly share.
Check out this blog post for an easy how-to guide on giving your existing or new bike rack a fresh coat of paint. From the essential materials and tools needed to key steps for success, we’ll show you everything required for that perfect finishing touch.
Methods on How to Paint a Bike Rack
There are two primary methods used for painting bike racks: spray paint and latex paint. In outdoor environments, spray paint provides better durability but requires more skill, while latex paint provides a glossy, even finish.
For both methods, proper surface preparation and masking of adjacent areas are necessary. Here are the steps for each:
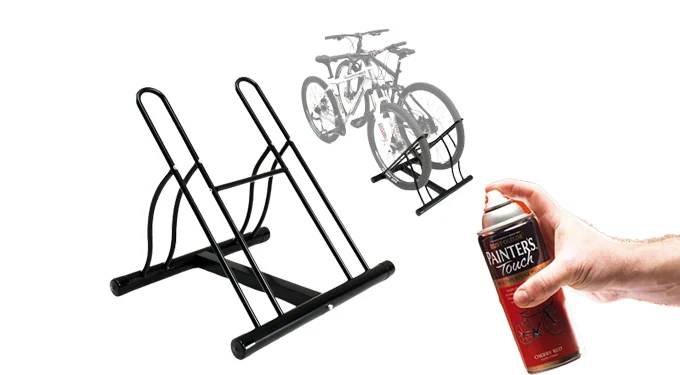
Method 1: Spray Paint Method
If you’re in a rush and need to give your bike rack an instant makeover, look no further than the spray paint method – it’s one of the quickest and most efficient ways to give that tired old fixture an instant makeover. In just minutes, you can achieve full coverage with this easy solution.
The supplies you need:
- Spray paint in your desired color
- Masking tape
- Sandpaper or sander
- Primer
- Clean rags/towels
1. Preparing the Surface
Before beginning any painting project, it is important to ensure that the surface you’re painting is prepped properly. This means getting rid of any dirt, dust, and grime from your bike rack by scrubbing it with soap and water or wiping it down with mineral spirits.
Once cleaned, you should use sandpaper to lightly scuff up the surface and create a good bond between your coat of primer and paint.
2. Selecting Primer & Paint
For a successful spray paint job on your bike rack, you’ll need to choose appropriate primers and paints that have been designed specifically for metal surfaces. Look for products marked “rust-inhibiting” or “rustproof” to ensure the longevity of your finish coat.
Depending on the condition of your existing paint job or if you’re starting from bare metal, multiple coats may be necessary to achieve durable results. So make sure to check out each product’s instructions carefully before you start spraying.
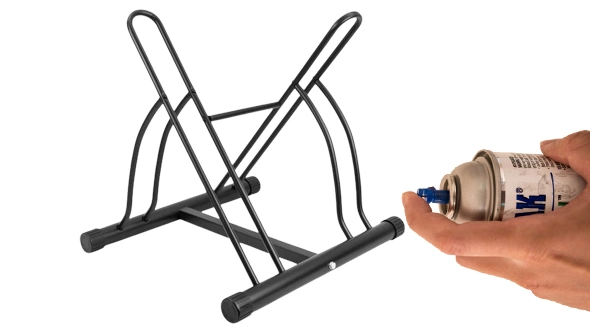
3. Applying Spray Paint
Once you have prepped the surface accordingly and chosen the right primer and paint products for the job, it’s time to start applying the spray paint. If possible, take your road bike hitch rack offsite or somewhere outdoors.
This will help minimize fumes in confined spaces while still allowing easy access during the application process.
Be sure to read all instructions on each can carefully before use – this includes shaking/stirring cans thoroughly before spraying as well as checking nozzle settings (angle, distance). Which vary based on brand/product type/application needs etc.
With these things checked off, it’s time to get started by holding the can 10-15 inches away from the target area. Begin painting in even strokes going left-right, then up-down in overlapping passes until desired coverage is achieved. Apply masking tape to any areas that should not receive paint.
Method 2: Latex Paint Method

Gathering Materials :
- A container of latex paint
- A roll of masking tape
- Several paintbrushes
- A small roller
- Drop cloths or newspapers
1. Preparing the Area:
Before beginning to paint a bike rack, it is essential to properly prepare the area, just like you would for the above spray paint method. Move any plants or furniture away from where you will be working and place drop cloths or newspapers around the area that needs to be covered so that no paint gets onto surfaces it shouldn’t.
Choose an outdoor space with plenty of ventilation but make sure it’s not windy so that particles don’t blow into your work area or onto your finished product. Once the area has been cleaned and made safe, it’s time to move on to the next step.
2. Priming
The next step in painting a bike rack is priming. Primer helps provide an additional layer of protection against rust and corrosion and provides a smooth surface for the paint to adhere better. The primer should be applied in thin coats, with plenty of drying time between each coat.
Allowing each coat to dry completely before applying another will help ensure proper adhesion and coverage. For best results, use a latex primer designed for metal surfaces such as those used for trunk racks.
3. Applying Latex Paint
Once the primer has been applied and allowed to dry completely, it’s time to begin applying a coat of latex paint. Start by shaking up your can of latex paint thoroughly to mix any pigments that may have settled during storage.
Next, pour some of the paint into a separate container, this will help keep any foreign particles from entering your main can while you are painting. Begin using either an airless sprayer or brush to apply even coats of paint over all areas of the trunk bike rack.
When finished, allow ample time for each coat to dry before applying another one. This will ensure proper adhesion throughout your project.
How Many Coats Should a Bike Rack Be Painted?
Applying two thin coats of paint on the bike rack is recommended for the best results. This ensures that all areas of the rack are adequately covered and protected. If your mountain bike roof rack was previously painted and has scratches or other signs of wear and tear, it may require more coats.
Aside from that, it is beneficial to wait for around 24 hours between each coat to allow them to dry properly before applying a second coat. This will help ensure an even coverage of color and prevent the paint from dripping down or clumping up in certain spots.
Is It Possible to Paint a Bike Rack With Multiple Colors?
Yes, it is possible to paint multiple colors on a bike rack if desired. There are many ways in which one can achieve the look in many ways, but it is important to practice blending colors before attempting this project.
A basic understanding of color theory can also assist you in selecting complementary hues and shades to achieve the best effect. Further, it is essential to remember that different types of paints require different techniques when blending multiple colors together.
For example, acrylic paints will dry faster than oil-based paints and need more time for blending. To get the perfect combination of paints, it’s best to practice on sample materials first.
Does the Bike Rack Need Primer Before Painting?
It is necessary to use a primer before painting if the bike rack is made of bare metal or has any imperfections, such as rust or scratches, that can affect its appearance once painted over. Primers protect from rusting and corrosion while helping the paint stick better and last longer.
There are a variety of primers that can be used for painting bare metal. Primers designed specifically for use on metal typically contain rust-inhibiting properties and come in both oil-based and water-based varieties.
Oil-based primers provide superior corrosion protection and better adhesion when compared to water-based formulas, making them the best option for long-term protection against rust and other corrosion damage. Some specialized primers also include UV inhibitors, heat resistors, sound deadeners, and chemical resistance.
For example, flat rusty metal primer, triple thick ponding primer, all surface primer, and stops rust automotive spray primer are some good quality primers that are specifically formulated for metals.
Create a Work of Art with Your Bike Rack
Painting your bike rack can be an enjoyable project that leads to a beautiful result. By following the tips outlined above, you can ensure that your bike rack looks its best for years.
Start by determining how many coats of paint are necessary for optimal results, and consider experimenting with multiple colors if desired. It’s also important not to forget about rust treatment before beginning any painting projects on metal surfaces.
With these helpful suggestions in mind, you’ll have no problem achieving the perfect outcome when painting your bike rack.
You Might be Interested: