To fix your electric scooter, start by checking the battery charger and cables for damage, then test voltage output to guarantee proper charging. Inspect all electrical connections for corrosion or looseness, and clean or repair as needed.
Calibrate the throttle and controller to restore smooth acceleration. Check the motor and wiring for faults or wear, and adjust or replace brake components for safety.
Following these steps methodically can restore performance—exploring further reveals detailed troubleshooting and maintenance techniques.
Key Takeaways
- Inspect and test the battery charger, cables, and charging port for damage or loose connections to fix charging issues.
- Check motor wiring, speed controller, and throttle voltage to diagnose and repair motor power or controller faults.
- Calibrate the throttle and controller by entering calibration mode and adjusting throttle and brake signals for proper responsiveness.
- Examine mechanical drive components like belts, chains, gears, and freewheel clutch for wear or obstructions and replace if needed.
- Regularly maintain and adjust brake systems by inspecting pads, tightening cables, and ensuring proper brake lever travel for safety.
Diagnosing Battery Charging Problems
When diagnosing battery charging problems, start by thoroughly inspecting the charger and its cables for any visible damage such as fraying or burnt areas. Position the charger and cables for easy access to ensure a complete inspection of the entire charging system.
Next, plug the charger into a wall outlet and verify if indicator lights activate. If uncertain, test the charger on a different scooter or try alternate power outlets to isolate charger functionality.
Plug the charger into a wall outlet and check indicator lights; test on another scooter or outlet if unsure.
Use a multimeter to measure the output voltage, ensuring it matches your scooter’s specifications. Confirm charger compatibility regarding voltage and amperage requirements to avoid charging issues.
Additionally, clean the charging port with a small brush to remove dirt or corrosion, inspect for loose connections or damage, and verify secure attachment to battery terminals.
Testing with a known good charger helps differentiate between charger and port faults, streamlining your diagnosis process.
Also, inspect wiring for any loose or damaged connections that could interfere with proper charging.
Troubleshooting Motor Malfunctions
Start by verifying the motor receives proper power; check the power switch, fuses, and throttle output with a multimeter.
It is also important to inspect the motor and speed controller for any signs of damage or shorts, as a malfunctioning controller can cause motor issues.
Next, inspect mechanical drive components like chains, belts, and gears for alignment or damage that could hinder motor engagement.
Regular maintenance and ensuring the components are securely locked can prevent many common issues, similar to how a Wordlock bike lock operates.
Motor Power Issues
Although electric scooter motors are generally reliable, you may encounter power issues stemming from various causes such as faulty switches, wiring problems, or component failures. Start by verifying the power switch is on and test the fuse or circuit breaker with a multimeter for continuity.
Check battery charge level, charger operation, and inspect all motor wiring and speed controller components for burn marks or melted insulation.
Measure throttle output voltage—it should read about 4.5–5V DC when engaged. Proper surface cleaning and maintenance can help prevent electrical connectivity problems and extend component life.
Know that the motor is typically located at the front or rear wheel, which helps target your inspection effectively by focusing on the motor placement area.
Look for loose or disconnected wires, ensuring connectors are clean and secure. Burned components require prompt replacement to avoid further damage.
Faulty speed controllers or throttles can cause constant motor running or failure; disconnect the throttle to isolate the fault.
Address battery and charging problems to restore consistent motor power. Regular inspection and preventive maintenance are key to avoiding unexpected motor malfunctions.
Mechanical Drive Problems
If you encounter grinding noises or unusual sounds from your electric scooter’s motor, mechanical obstructions or internal wear may be to blame. Begin by visually inspecting the motor housing and freewheel components for debris or foreign objects. Remove any trapped materials to restore smooth operation.
Next, assess the drive train: check belts, chains, cogs, and sprockets for wear, damage, and proper tension. Replace worn or missing components to prevent slipping or power loss. Ensuring proper tension is crucial, as overtightening spokes or parts can cause damage and reduce performance.
Additionally, examine freewheel clutches for wear that could reduce power transfer. Persistent noise after cleaning suggests internal motor wear, requiring professional servicing or replacement. Also, verify wiring integrity and connections to rule out electrical issues contributing to motor malfunction motor and controller issues.
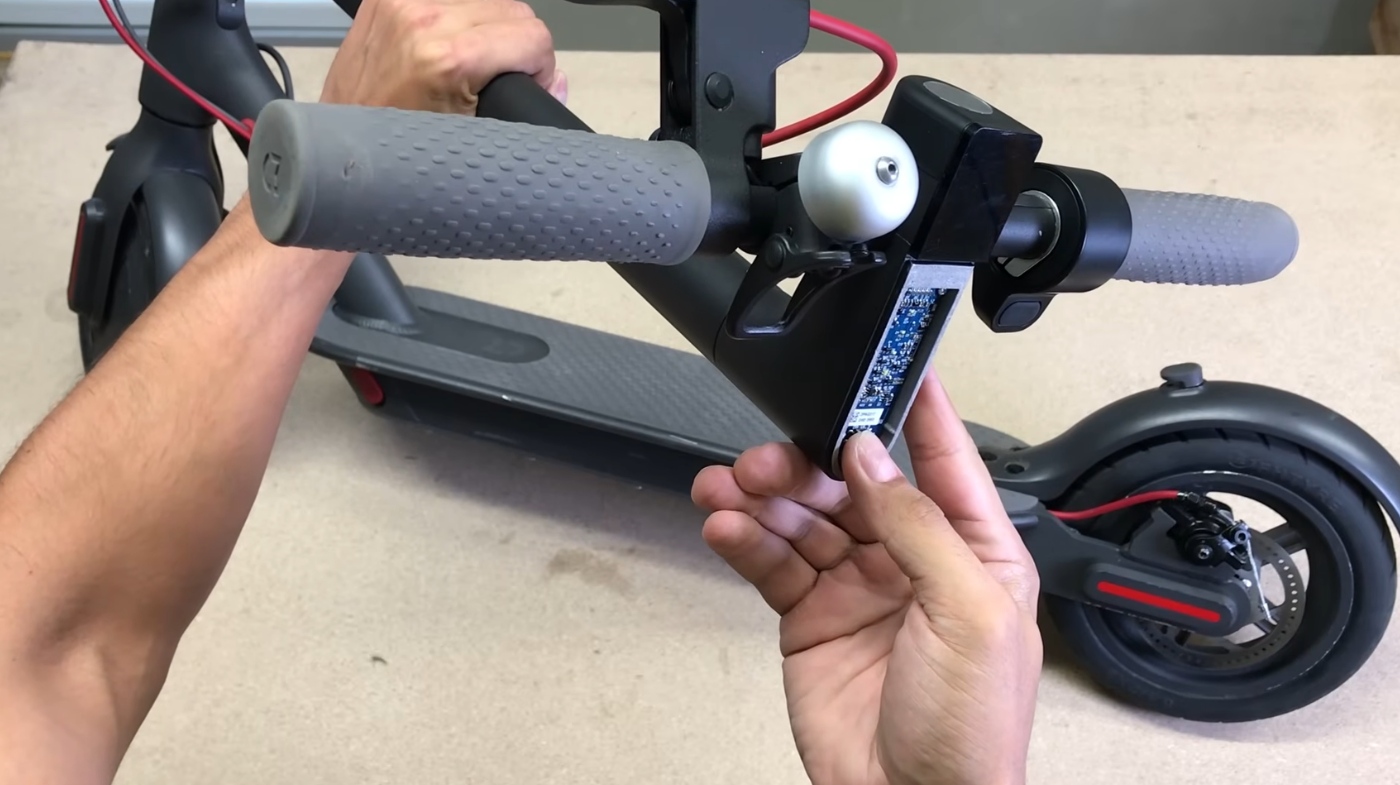
Inspecting and Repairing Electrical Connections
How do you guarantee your electric scooter’s electrical connections function reliably? Start by visually inspecting all wiring for damage, burns, or corrosion.
Use a digital multimeter to test continuity and voltage across key points like battery terminals and connectors. Finally, ensure every connection is tight and free from corrosion to maintain conductivity.
Focus on these steps:
- Identify and replace damaged wires or connectors with components matching original specs, referencing wiring schematics for accuracy.
- Repair battery connectors carefully, maintaining correct polarity and using soldering with heat shrink tubing for durability. Cleaning corroded areas with a baking soda solution before repair can improve connection quality and safety battery maintenance.
- Secure motor and controller wiring, checking for melted insulation or loose terminals, and rewire when necessary to prevent motor failure.
Testing and Calibrating the Throttle and Controller
After ensuring all electrical connections are sound and secure, you’ll need to verify and fine-tune the throttle and controller settings to guarantee accurate response and safe operation.
Begin by entering calibration mode—press and hold the power button and throttle for 10 seconds until “CAL” appears. It is important to perform this on a level, flat surface to ensure accurate calibration results. Proper calibration helps avoid issues similar to adjusting the clutch biting point on motorcycles for smooth engagement.
Fully twist the throttle, then slowly release it multiple times to calibrate its range. Next, squeeze and release the brake lever repeatedly to calibrate braking signals.
Exit calibration by holding the power button until normal display returns. Measure idle and full-throttle voltages to set voltage thresholds in the controller, adjusting iteratively for smooth response.
Verify the throttle’s neutral position via diagnostics, adjusting sensor or controller settings as needed. Finally, secure any adjustment screws to prevent shifts during use.
Maintaining and Adjusting the Brake System
While maintaining your electric scooter’s brake system, you must inspect all components thoroughly to guarantee peak performance and safety.
Begin by checking brake levers for firmness; avoid any spongy or loose feel that suggests cable or air issues. Inspect brake pads for wear, cracks, or contamination, replacing them if worn below 1 mm thickness.
Remember that different brake types require specific maintenance approaches to ensure optimal function. Choosing the right filter type for your scooter’s air intake can also impact overall engine performance and longevity.
Thoroughly inspect brake levers and pads to ensure firm response and replace pads worn below 1 mm thickness.
Next, assess caliper alignment by loosening bolts, squeezing the brake lever to center pads on the rotor, then re-tightening bolts. Confirm pads don’t rub during wheel rotation.
Finally, clean brake components monthly with a brake cleaner spray and soft brush to remove dirt and oil, ensuring consistent braking force.
Follow these steps:
- Inspect and test brake levers, pads, and cables.
- Align calipers precisely.
- Clean brake surfaces thoroughly.
Identifying and Fixing Wiring Issues
Because wiring issues can cause a range of operational problems—from dead motors to unresponsive throttles—it’s essential to understand your electric scooter’s wiring diagram before attempting any repairs.
Start by consulting the manufacturer’s factory wiring diagram to identify connectors, fuses, grounds, throttle, battery, motor, and controller circuits.
Accessing these diagrams through manufacturer websites and online forums can provide valuable insights and support. Ensuring your scooter is positioned on a stable, level surface before beginning any diagnostics can improve safety and accuracy.
Use a multimeter to test continuity and voltage across battery, motor, and throttle wires, focusing on common faults like corroded connectors, blown fuses, or damaged cables. Inspect throttle wiring carefully, noting color codes: green (signal), red (5V), black (ground).
Replace faulty wires and connectors precisely, ensuring secure ground connections. Always match wire colors and functions when installing replacements to prevent miswiring.
Performing Routine Maintenance for Longevity
Identifying and resolving wiring problems lays the foundation for reliable scooter operation, but maintaining your scooter regularly will keep it running smoothly and extend its lifespan. Focus on these critical routine tasks:
- Battery Care: Inspect battery connections monthly for corrosion or looseness; clean as needed. Use manufacturer-recommended chargers and avoid extreme temperatures to preserve capacity. Additionally, store the battery in a cool, dry place to maintain its health and prevent damage.
- Tire Maintenance: Check tire pressure weekly, clean tires to remove debris, and inspect for wear or damage. Rotate tires periodically to ensure even wear. Thorough cleaning can also prevent buildup that may affect tire performance and longevity.
- Brake System Checks: Every three months, inspect brake pads and mechanisms, clean components, adjust brake tension, and replace worn pads to maintain braking efficiency and safety.
Handling Common Wear and Tear Components
You need to regularly inspect tire wear to guarantee proper traction and replace tires showing tread thinning or damage.
Check brake pads for thickness and uneven wear, replacing them promptly to maintain safe stopping power.
Additionally, adjust cable tension to prevent slack that can impair braking and throttle responsiveness. Regular maintenance helps avoid issues caused by dirt buildup.
Keep tires properly inflated to the manufacturer’s recommended pressure to prevent premature wear and ensure safety proper inflation.
Brake Pad Replacement
How do you guarantee your electric scooter’s brakes maintain peak performance over time? Start by safely powering down and stabilizing your scooter. Use appropriate tools, such as a maintenance stand, for stability. Proper equipment use ensures safety and effectiveness during maintenance.
Then, follow these steps precisely:
- Remove the wheel carefully using the correct Allen wrench, noting any quick-release mechanisms and handling hub motor wires gently.
- Extract worn brake pads by detaching the caliper cover and sliding out the old pads, inspecting for thinning or glazing.
- Insert new pads aligned perfectly with the disc or drum, re-secure the caliper cover, reinstall the wheel, and tighten fasteners without contaminating the pads.
Finally, adjust the brake cable tension for ideal lever response, test the brake function for noise or uneven contact, and perform a brief ride to confirm reliable stopping power.
Tire Wear Inspection
Although tires may seem durable, regular wear and tear can compromise their performance and safety. You should inspect tires for cracks, uneven tread, bald spots, and valve stem damage.
Use a pressure gauge to maintain manufacturer-recommended inflation, as both under- and over-inflation impair traction and control.
Replace tires with significant wear or damage promptly. Address slow leaks by examining valves and patching or replacing inner tubes. Keep spare tubes or tires for quick repairs. Regularly checking tire condition and pressure improves traction, stability, and control.
| Inspection Focus | Common Issues | Recommended Action |
|---|---|---|
| Tread Wear | Bald spots, uneven wear | Replace tire |
| Surface Damage | Cracks, cuts, punctures | Inspect, patch or replace |
| Valve Stems | Leaks, cracks | Repair or replace |
| Tire Pressure | Under/over inflation | Adjust to spec |
Cable Tension Adjustment
Inspecting tire condition is only part of maintaining your electric scooter’s performance; cable tension directly affects brake responsiveness and throttle control. To adjust cable tension, first locate the barrel adjusters near the brake lever or throttle assembly.
Follow these steps:
- Loosen the lock nut securing the cable adjuster with an 8mm wrench.
- Turn the barrel adjuster incrementally (about 1/6 turn) to tighten or loosen the cable, watching for proper brake pad engagement or throttle response.
- Test the brake lever travel or throttle movement after each adjustment to avoid overtightening, then securely retighten the lock nut.
It is also important to verify that the brake light activates simultaneously with brake engagement to ensure proper brake light functionality.
Check cables regularly for wear or fraying and replace if damaged. Proper tension prevents drag, sluggish response, and extends cable life, ensuring ideal scooter control and safety.
Frequently Asked Questions
How Do I Update the Scooter’s Firmware?
To update your scooter’s firmware, first identify its make and model and download the correct firmware from the official source.
Fully charge the battery, then connect the scooter to your computer via USB or serial cable. Launch the flashing software, select the appropriate COM port, and load the firmware file.
Start the flashing process without interruption. Once complete, verify the update and perform a test ride to guarantee proper function.
Can I Ride My Scooter in the Rain Safely?
You can ride your scooter safely in rain only if it has an IPX4 rating or higher. Check your manufacturer’s guidelines to confirm water resistance. Reduce speed, brake gradually, and avoid deep puddles to maintain traction and prevent electrical damage.
Keep a safe distance from others due to longer stopping distances and slippery surfaces. Always dry your scooter thoroughly afterward to prevent corrosion and electrical failures.
What’s the Best Way to Transport a Scooter on a Bike Rack?
You should choose a hitch-mounted rack for transporting your scooter, as it offers strong support and low loading height. Secure your scooter using ratchet straps around the frame and wheels, adding protective padding to avoid damage.
Position the scooter’s heaviest parts closest to the vehicle to optimize balance. Regularly check strap tension during transit, and use lockable clamps or cables if you leave it unattended to guarantee safety and stability throughout your trip.
How Do I Reset Error Codes on the Scooter Display?
To reset error codes on your scooter display, first power off the scooter completely. Locate the reset button—usually under the deck or near charging ports—and press it firmly for about 10 seconds using a tool if needed.
Wait for a click or flashing light confirming the reset. Release the button, power the scooter back on, and check the display for cleared error codes. Finally, perform a test ride to verify normal operation.
Are There Recommended Storage Tips for Long-Term Non-Use?
Storing your electric scooter long-term is like preserving a fine instrument—you need precision. Clean it thoroughly, dry it completely, and inflate tires to recommended pressure.
Disconnect the battery and store it separately at 50% charge in a cool, dry spot between 50°F-77°F. Keep the scooter indoors, away from extreme temperatures and moisture. Check battery charge every 1-2 months, recharge if needed, and use a breathable cover to prevent dust buildup.
Restore Your Electric Scooter’s Performance with Simple Steps
Fixing your electric scooter may seem complex, but by methodically diagnosing battery, motor, and wiring issues, you’ll pinpoint problems quickly. Don’t worry if you’re not an expert — following step-by-step troubleshooting and routine maintenance ensures reliable performance and longevity.
With precise inspection and calibration of components like the throttle and brakes, you’ll restore ideal function efficiently. Stay consistent with upkeep, and your scooter will serve you well without costly professional repairs.