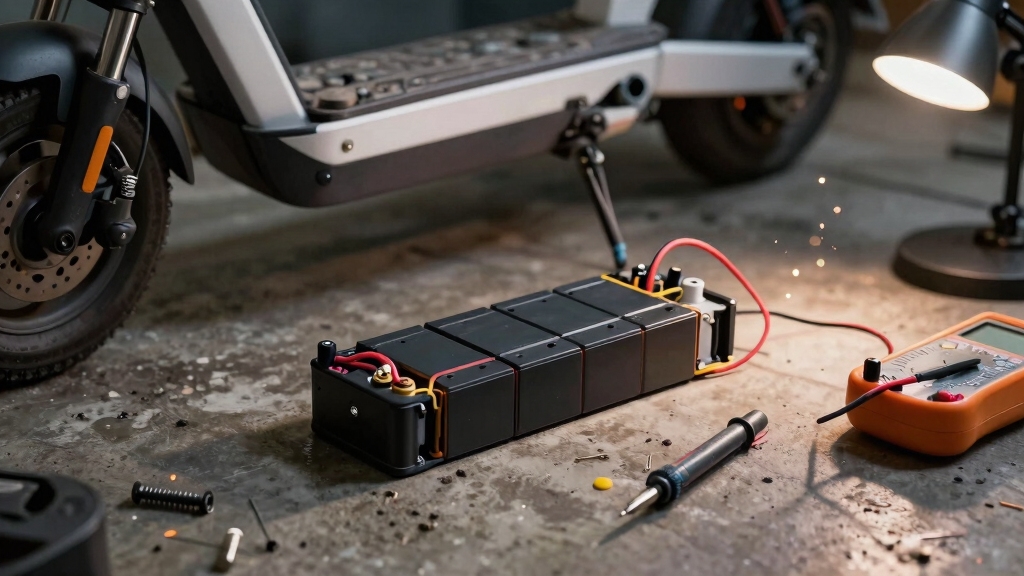
To fix a scooter battery that won’t charge, first test the charger indicator light and output voltage with a multimeter. Ensure you use the correct charger.
Inspect cables and connectors for damage, corrosion, or loose fittings, cleaning or reseating as needed. Check the scooter’s charging port and fuses for faults.
Measure battery voltage to detect deep discharge and perform a soft BMS reset. If necessary, deep-charge the battery slowly to restore capacity.
Detailed troubleshooting steps will help you identify and resolve other underlying issues.
Key Takeaways
- Check the charger indicator light and measure output voltage to confirm the charger is functioning properly before testing the battery.
- Inspect and clean all cables, connectors, and charging ports for damage, corrosion, or loose fittings to ensure secure electrical contact.
- Test battery wiring and charging ports with a multimeter and verify fuses or circuit breakers are intact and reset if necessary.
- Perform a BMS soft reset by powering off, unplugging, holding the power button 5–10 seconds, then rest before reconnecting the charger.
- Measure battery voltage to identify deep discharge; if low, apply a slow, continuous charge in a ventilated area for 48–72 hours.
How To Check If Your Scooter Charger Is Working?

To check if your scooter charger is working, start by plugging it into a known functioning outlet and observing the indicator light. If the light fails to illuminate, the charger is likely defective and needs replacement.
Next, examine the charging cable meticulously for frays, kinks, burns, or cuts that could disrupt power flow. Use a multimeter set to voltage mode: place the black probe into hole No. 3 and the red probe into hole No. 1 on the charger output to verify it delivers the standard voltage.
Additionally, confirm that the wall outlet supplies power, as outlet failure can mimic charger faults. To verify compatibility, test your scooter with another compatible charger. If it charges normally, your original charger is faulty.
For optimal charging and safety, always use the original charger designed for your scooter model.
What To Do When Your Scooter Charger Fails?
First things first, take a look at the charger’s indicator light. You want to check if it lights up when you plug it into a working outlet. If it doesn’t, that could be a sign something’s off.
Next, let’s inspect the cable and connections. Look for any visible damage or loose fittings that might be interrupting the power flow. Sometimes, it’s the little things that can cause big headaches!
Finally, grab a multimeter and test the charger’s voltage output. You’ll want to make sure it meets the scooter’s charging specifications. This step is super important to ensure everything’s functioning as it should.
Also, be sure to verify that you’re using the correct, manufacturer-approved charger to avoid any damage or safety issues.
Indicator Light Check
Begin by plugging your scooter charger into a confirmed working outlet and carefully observing the indicator lights.
If the charger’s light fails to illuminate, this signals a probable internal fault requiring charger replacement.
A steady green or red light typically indicates normal operation or charging in progress.
Note any blinking patterns, as some models use them to signal errors or charging status.
Refer to your charger’s manual for specific light codes to diagnose issues accurately.
Make sure you allow sufficient time, usually a few seconds, for the indicator to activate after connection.
If the light remains off despite a verified power source, discontinue use and consider testing with an alternate charger.
This methodical check confirms whether the charger is functional before proceeding to inspect cables or scooter connections.
For persistent charging issues, performing a basic reset procedure on your scooter can help resolve minor electronic glitches affecting the battery system.
Cable And Connection Inspection
Carefully examine the charger cable and all connection points for signs of damage or looseness, as these are common causes of charging failure.
Start by inspecting the cable for frays, cuts, or burn marks that could disrupt power flow.
Next, verify that the plug fits securely into both the charger and scooter ports.
Then, open the battery compartment to check the battery wiring plug for a firm, proper seat.
Finally, clean all connectors and terminals with a soft brush or electronic cleaner to remove corrosion and debris that hinder conductivity.
- Inspect cable integrity for physical damage.
- Confirm secure, tight connections at all plugs.
- Examine battery wiring connection inside compartment.
- Clean terminals and connectors to guarantee contact.
Corrosion and moisture can increase resistance and cause intermittent charging issues, so ensuring connectors are dry and free from rust is essential for reliable power flow and to prevent electrical malfunctions.
Voltage Output Testing
Measure the charger’s voltage output using a multimeter set to voltage mode to determine if it delivers the correct power.
Insert the black probe into hole No. 3 (ground) and the red probe into hole No. 1 (positive terminal) on the charger connector.
Verify the displayed voltage matches the charger’s rated output specified on its label. A significant deviation indicates charger failure.
If voltage is absent or below specification, replace the charger. Confirm the wall outlet supplies power before testing.
Additionally, test voltage with an alternative compatible charger to isolate the issue.
Accurate voltage output guarantees the battery receives proper current for charging. This step is critical before proceeding to battery health assessment or system resets, as charger malfunction is a common cause of charging failure.
If charging issues persist despite correct voltage, consider performing a battery management system reset as some scooters require it to resolve electrical faults.
Spotting Damage In Scooter Charger Cables And Connectors
When you check your scooter charger cables and connectors, focus on identifying any visible signs of damage such as fraying, kinks, cuts, or burn marks that could interrupt power flow.
Damaged cables can cause inconsistent or no charging. Examine the entire cable length and connectors thoroughly.
Follow these steps to spot damage effectively:
- Inspect cable insulation for cracks, exposed wires, or discoloration indicating overheating.
- Check connectors for bent, corroded, or missing pins that impair electrical contact.
- Look for stiffness or deformities that suggest internal wire breaks.
- Verify that connector housings are intact, without cracks or loose fittings.
Addressing these issues early prevents charging failures and extends charger lifespan.
Also, keep in mind that improper charging habits such as overcharging can harm battery performance and longevity.
How To Test Scooter Charging Ports And Connections?
First things first, take a moment to inspect the battery wiring. Make sure all the plugs are secure and seated correctly. It’s a simple step, but it can save you a lot of headaches later on!
Next up, you’ll want to check every connection point between the scooter, battery, and charger. Are they tight and properly aligned? Double-checking this can make a big difference in performance.
Finally, let’s test the charging port’s functionality. Grab a multimeter and switch it to diode mode. This will help you confirm that everything is working as it should. Easy peasy!
To ensure safety, always work in a well-ventilated area and wear protective gear when handling electrical components.
Inspect Battery Wiring
To make sure your scooter charges properly, you’ll want to check the battery wiring by opening the battery compartment and verifying that the plug connecting the battery’s charging port to the scooter’s charging base is securely seated.
Loose or partially connected plugs can interrupt power flow, preventing charging.
Follow these steps to inspect battery wiring methodically:
- Open the battery compartment cover carefully to avoid damaging connectors.
- Locate the plug joining the battery charging port to the scooter’s charging base.
- Visually inspect for any signs of damage, corrosion, or dirt on the plug and port.
- Confirm the plug is fully inserted and aligned without any gaps or misfits.
Ensuring the wiring connection is intact is critical before moving on to further troubleshooting steps.
Additionally, power down the entire system first to avoid electrical surges and ensure a safe reset process.
Verify Connection Tightness
Although inspecting wiring is essential, verifying the tightness of all charging connections is equally critical to guarantee uninterrupted power flow.
Begin by carefully opening the battery compartment and visually inspecting each plug and connector between the battery, scooter, and charger.
Firmly press or gently twist connectors to ascertain they’re fully seated and aligned without play or looseness.
Use your fingers to confirm there’s no wiggle or gap at connection points.
Loose connections can cause intermittent charging or complete failure.
If you detect any looseness, disconnect and reconnect the plugs to restore secure contact.
Avoid forcing connectors, as damaged pins will impair power transfer.
Maintaining tight, secure connections reduces resistance and prevents voltage drops, ensuring consistent battery charging performance and extending component longevity.
Proper wiring and connection inspection is especially important because high resistance points can lead to increased heat generation and accelerated battery degradation during charging, highlighting the need for regular wiring inspections.
Test Port Functionality
Once you make certain all charging connections are secure, you can proceed to test the functionality of the scooter’s charging ports.
Use a multimeter set to diode mode for accurate diagnostics. Follow these steps:
- Place the black probe on the negative pole of the battery.
- Position the red probe on charging hole No. 3 to test the port.
- Listen for a beep; a sound indicates the port operates correctly.
- If no beep occurs, inspect for corrosion or loose connectors and clean or re-seat as necessary.
This method confirms whether the charging port allows current flow, helping you isolate port issues from other charging system faults.
Proper port functionality guarantees reliable power delivery to the battery. For best results, always inspect wiring for damage or corrosion before testing charging ports.
Find And Fix Blown Fuses Or Circuit Breakers
Locate the fuse or circuit breaker by consulting your scooter’s user manual. It’s typically found under the deck near the battery compartment.
Once located, visually inspect the fuse for any breaks or burn marks on the metal strip. A damaged fuse interrupts current flow and prevents charging.
If your scooter uses a resettable circuit breaker, look for a reset button and press it firmly to restore function.
Make sure the kickstand is in the up position, as some models disable charging when down.
Replace any blown fuses with one matching the exact amperage specification from your manual.
After replacement or reset, reassemble the compartment securely and test the charging function.
This methodical approach guarantees the power supply to the battery remains uninterrupted and prevents further electrical faults.
Reset Your Scooter’s Battery Management System
Perform a soft reset on your scooter’s Battery Management System (BMS) by turning the scooter off, unplugging the charger, and holding the power button for 5 to 10 seconds.
This procedure reinitializes the BMS, clearing minor electronic glitches that may prevent charging. After the reset, allow the battery to rest for a few minutes before attempting to recharge.
Follow these steps methodically:
- Make sure the scooter is powered off and the charger is disconnected.
- Hold the power button continuously for 5 to 10 seconds.
- Let the battery rest for 5 minutes post-reset.
- Reconnect the charger and power on the scooter to resume charging.
This reset helps resolve software-related faults in the BMS, restoring normal charging function without requiring hardware replacement.
Measuring Battery Voltage To Assess Health
To begin, grab your multimeter and check the battery voltage at its terminals while the scooter is unplugged. It’s a simple step, but it’s super important!
Once you have the reading, compare it to the manufacturer’s specified voltage range. This will help you see if the battery is holding a proper charge.
Now, why is this important? Well, understanding these voltage readings can give you a good idea of the battery’s health. If the numbers are off, it might be time to think about a replacement.
It’s all about keeping your scooter running smoothly!
Battery Voltage Testing
Start by measuring the battery voltage with a multimeter set to the appropriate voltage range while the battery is disconnected from the scooter. This guarantees you get an accurate no-load voltage reading.
Follow these steps for precise testing:
- Set the multimeter to DC voltage mode matching the battery’s rated voltage.
- Connect the black probe to the negative terminal and the red probe to the positive terminal.
- Record the voltage displayed and compare it to the manufacturer’s nominal voltage specifications.
- Repeat the measurement after a brief rest period to confirm consistency.
Maintaining proper contact with terminals during testing is critical to avoid false readings. This methodical approach helps identify batteries with voltage drop issues before proceeding to interpret the results.
Interpreting Voltage Readings
Interpreting voltage readings requires comparing the measured values against the battery’s nominal voltage to determine its health status.
First, measure the battery voltage with a multimeter while the battery is disconnected from the charger or scooter.
A reading markedly below the nominal voltage indicates a depleted or damaged battery.
For example, a 36V battery reading below 30V suggests deep discharge or failure.
Conversely, a voltage close to or above nominal indicates proper charge or potential overcharge issues.
Also, observe voltage stability; fluctuations during testing may signal internal cell damage.
Use manufacturer specifications as your reference point to assess readings accurately.
This methodical approach helps you decide if the battery needs recharging, deep charging, or replacement based on precise voltage data.
How To Deep Charge Your Scooter Battery?
Perform a deep charge on your scooter battery by connecting it to a charger and allowing it to charge continuously for 48 to 72 hours. This extended charging period helps restore capacity in lead-acid batteries that have become deeply discharged.
Follow these precise steps:
- Verify the charger’s output voltage matches battery specifications using a multimeter.
- Connect the charger securely to the battery terminals, ensuring no corrosion or loose connections.
- Keep the scooter and charger in a cool, well-ventilated area to prevent overheating during the long charge.
- Monitor the battery voltage periodically; once stable near full charge, disconnect the charger promptly to avoid overcharging.
This methodical approach revives battery performance, improving charge retention and scooter reliability.
Prevent Battery Over-Discharge And Storage Problems
Although it may seem convenient to leave your scooter unused for extended periods, failing to prevent battery over-discharge during storage can irreversibly damage its capacity. To avoid this, make certain the battery is fully charged before storage and disconnect the power switch to prevent parasitic drain.
Check battery voltage periodically; if it drops below recommended levels, recharge promptly to halt deep discharge effects. Store the scooter in a cool, dry environment to minimize self-discharge and chemical degradation.
Avoid leaving the battery completely depleted, as this triggers voltage detection systems that block charging initiation. Regular maintenance charge cycles every few months will preserve battery health.
Tips To Prevent Battery Problems When Charging
To keep your scooter battery in peak condition, you should follow specific charging practices that prevent common issues like overcharging and thermal stress. Proper charging extends battery life and maintains performance.
Follow these key tips:
- Disconnect promptly: Remove the charger immediately after full charge to avoid overcharging damage.
- Manage temperature: Allow the battery to cool before charging. Heat reduces efficiency and longevity.
- Maintain partial discharge: Recharge when battery capacity drops to 20-30% to prevent deep discharge stress.
- Avoid extended charging: Never leave the battery charging overnight or beyond necessary duration to prevent degradation.
Implementing these protocols methodically guarantees reliable battery function and minimizes premature failure during charging cycles.
Frequently Asked Questions
How Often Should I Replace My Scooter Battery for Optimal Performance?
You should replace your scooter battery every 2 to 3 years for peak performance, depending on usage and maintenance.
Monitor voltage regularly; if it reads markedly below specifications or loses charge quickly, it’s time for a replacement.
Avoid over-discharging and overcharging to extend battery life.
Performing routine deep charging 2-3 times a year helps maintain capacity, but once performance declines noticeably, install a new battery to guarantee reliable operation.
Can Extreme Weather Conditions Damage My Scooter Battery?
Think of your scooter battery as a delicate plant.
Extreme heat scorches leaves, while severe cold freezes roots. Yes, extreme weather conditions can damage your scooter battery’s chemical balance, reducing capacity and lifespan.
High temperatures accelerate degradation, and freezing can cause internal damage, preventing charging.
To protect it, store your scooter in moderate temperatures, avoid charging immediately after riding in heat, and perform routine maintenance to guarantee peak battery performance and longevity.
Are There Specific Brands of Chargers Recommended for My Scooter Model?
You should always use chargers recommended by your scooter’s manufacturer to guarantee compatibility and safety.
Check your user manual or official website for approved charger models and specifications, such as voltage and amperage ratings.
Using third-party chargers can risk improper voltage delivery or connector damage.
If uncertain, contact customer support for precise recommendations.
Stick to certified chargers designed for your specific scooter model to maintain battery health and peak charging performance.
How Do I Dispose of an Old or Damaged Scooter Battery Safely?
Think of your old scooter battery as a tired traveler needing a proper resting place, not just tossed aside.
You should never throw it in regular trash due to hazardous materials.
Instead, locate certified battery recycling centers or hazardous waste facilities.
Remove the battery carefully, avoiding damage to terminals, and transport it in a non-conductive container.
This method guarantees environmental safety and regulatory compliance while responsibly retiring your battery’s lifecycle.
What Signs Indicate My Scooter Battery Needs Professional Repair or Replacement?
You’ll know your scooter battery needs professional repair or replacement if voltage tests show markedly lower readings than specs, or if it won’t hold a charge despite full charging.
Rapid power loss during use, visible corrosion or damage on terminals, or persistent charging failures after resets also indicate serious issues.
If deep charging for 48-72 hours doesn’t restore capacity, it’s time to consult a professional or replace the battery.
Power Up with Confidence: Keep Your Scooter Running Strong
If your scooter battery won’t charge, don’t overlook the charger. Around 30% of charging issues stem from faulty chargers.
Start by systematically testing the charger, cables, and connections. Measure battery voltage to determine its health, then deep charge if needed.
Regularly inspect fuses and prevent over-discharge during storage. By following these precise steps, you’ll extend your battery’s lifespan and ensure reliable performance every ride.
Stay methodical to keep your scooter powered efficiently.